![String Format.png]](https://support.fu3e.com/hs-fs/hubfs/String%20Format.png?height=26&name=String%20Format.png)
The invite users button allows you to invite new users to a project or ticket, or add existing users to a project or ticket they do not yet have access to.
The options available will depend on permissions, project administrators and permitted team members can now:
- Invite external users via email to view, update, or create specific forms or tickets.
- Assign permission groups for fine-grained control, ensuring users only see and act on what you choose.
- Track and audit all invitations and permissions for complete transparency.
How to Invite New Users to a Project
Use this process to simplify onboarding for new users such as suppliers or those responding to tenders - or when the person you want to invite does not already have a fu3e user account.
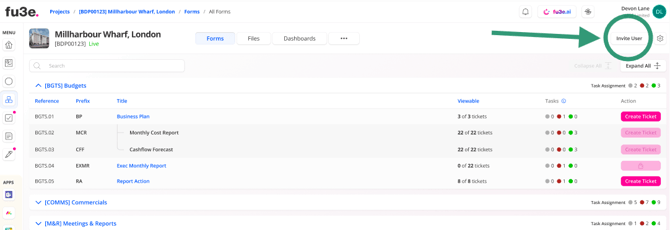
The Invite User button is available within the project towards the right of the screen and remains in view from project forms, files and dashboards.
To invite users to a form only then see this article for guidance.
Steps
1. Open the relevant project and select the Invite User button from the top right of the screen. The button is available from all areas of the project, by clicking the Invite User button you will invite the user to that contextual project.
2. Enter the email address of the person you want to invite, use commas to add multiple email addresses then select Add.
3. Review or complete the new user details to ensure the name, email address and organisation has been added.
Note: Organisations may be visible but unavailable to select. Any greyed out organisations will have other project or group permissions linked to them, which means they can only be assigned through the project or user admin pages.
4. Select the permission groups from the dropdown available and click the icon to review the detail behind the permissions applied. Permission groups control what the invited user can see and do.
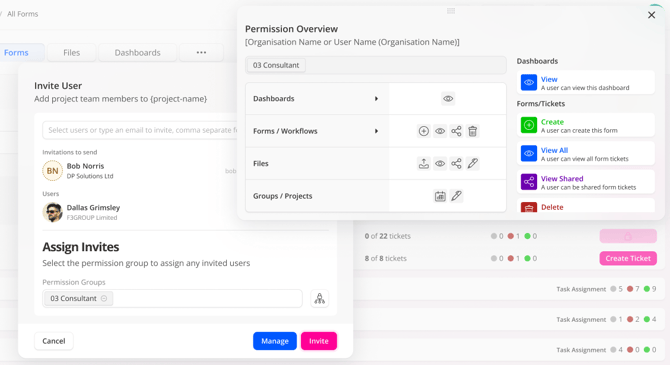
5. Select Invite and review the details shown in the pop up screen.
The new invited user will receive an invitation email, where they can activate their account by creating a password and accepting the fu3e user terms and conditions.
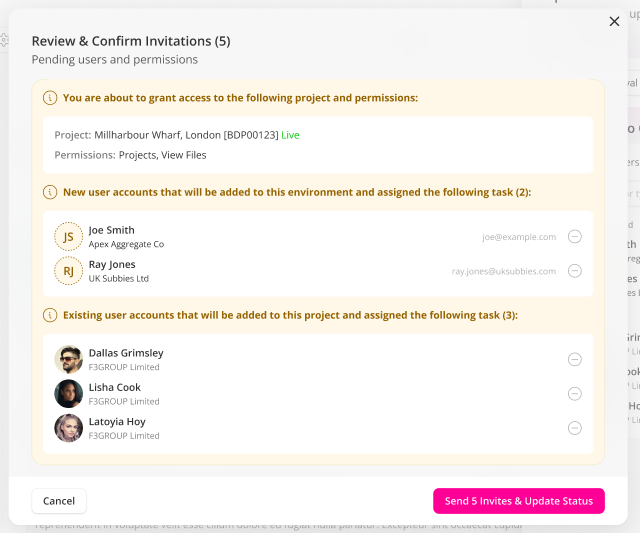
They will be granted access to the project they were invited to, subject to the permissions assigned.
FAQs:
Q: Can I invite users who already exist in fu3e but not the project?
A: Yes,follow the same steps by clicking the Invite User button and instead of adding a new email initiation, the user's existing name and organisation will be shown. Select the user and review the pop up to confirm that the existing user will be added to the project and apply the permission group.
Q: Can I invite users to a form and not the entire project?
A: Yes, although this requires administrator set up - you can assign a ticket to a person who does not yet have a fu3e account.
Q: What does the Invited User receive when I send the invitation?
A: When a new user is invited, they receive an email inviting them to join the fu3e environment. The email includes an activation link to set a password then read and accept fu3e's user policy.
Q: Why are some organisations not available or greyed out?
A: There will be other projects or group permissions linked to them, which means they can only be assigned to users through the relevant administration areas.
Q: What are Permission Groups?
A: These are pre-defined settings to mange the access of users, you can add multiple permission groups and open the detail behind the settings by clicking the icon.