Steps to follow:
- Hover over the left slide out panel and click the Users icon to open the User list.
- From the User list, you can search, filter and view the following details about each user:
- Name
- Email Address
- Administrator access - opens options for specific administrative permissions for each module within fu3e
- Environment access - site wide permissions, not linked to individual projects or groups
- The groups or projects assigned
Note: Other information is available such as the status, created date and ID.
Click the blue column headers to sort by ascending or descending order.
3. Customise the List
You have the flexibility to personalise the display of user data.
Access the View Cogwheel to:
- Re-arrange columns
- Apply sort orders
- Set filters
![]()
4. Create or Update a User
To Create: Click the "Create User" button on the top right of the screen.

To Update: Use the three-dot menu next to the User and select "Update” or click into the relevant row.

Note: When you're creating or updating a Project, you can also add or remove users from that area. Either click the three dots when hovering over a project or open a project and the settings 'cogwheel' to access the edit project screens.
 or
or 
5. Stage 1: Manage User
From the Create User screen enter the user first and last name, email address and select an organisation from the drop down. If you are editing or updating the existing user, ensure the "Active" checkbox is selected.
Environment Access provides users with site wide permissions, that are not linked to individual projects or project groups. This includes permissions such as global dashboard visibility.
Administrator Access opens options for specific administrative permissions for each module within fu3e.
Click Save & Create to then assign Group or Project permissions.
- Assign groups or projects to the User directly
- Then select the appropriate Permission Group from the dropdown and click Assign to add the permissions to the table below.
- Search, add or remove any projects or groups as needed.
Important: Click Save & Close to apply changes. Ensure all permissions and project assignments align with the intended role specifications.
7. New User has been created
- Once saved and closed, a new User will be created, where an email invitation will be sent to the corresponding email address with a clickable link directing them to log in to fu3e.
Hints and Tips with Permissions
- Click on this icon to open a pop up that shows the different options available for permissions.

- If the icon is next to a project, it will display the specific permissions for that project or group.

- You'll notice some icons are colourful to indicate they are active permissions.
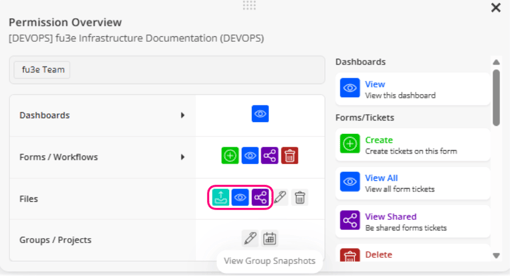
- Any greyed-out icons are inactive permissions or do not apply.
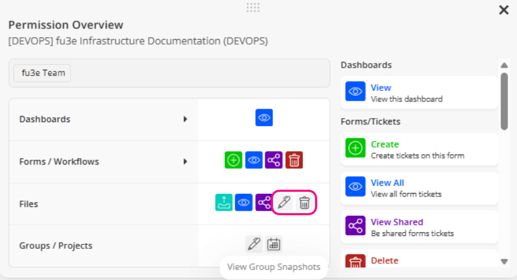
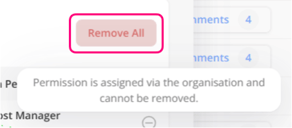
- Select the Remove All button to clear any permissions assigned to the table - once you've clicked Save it will then apply those changes.
FAQs
Q. What are permission groups?
This is a group of permissions which have been setup to align to your business requirements. Typically, these are aligned to roles or responsibilities within your company.
Q. What is Administrator Access?
These are roles that can be assigned to the user to allow moderator capabilities of the different modules within fu3e.
- Project/Group Manager – Access all projects and groups, with the ability to create, update and delete.
- User Moderator – Manage user base
- Organisation – Maintain organisations and custom organisation tags
Q. What is Environment Access?
It allows site wide permissions to users, such as visibility of global dashboards or access to fu3e.ai. It is unrelated to any individual projects or project groups.
Q. What happens is a User is marked as Inactive?
The user will no longer be able to access fu3e.
Q. What is an Expired Invite?
Every new user receives an email with a link directing them to log in to fu3e. The email expires after 30 days, and the user status will change from Invited to Expired Invite.
Simply click on the three-dots to Resend Invite.

